PHP„Āģ„ÉČ„ā≠„É•„É°„É≥„ÉąšĹúśąź„ĀęPhpDocumentor„āíšĹŅ„Ā£„Ā¶„ĀŅ„āč
- 2009.02.22 (śó•) 09:31
- PHP
- PHP,phpdocumentor
PHP„āíšĹŅ„Ā£„Ā¶„Éó„É≠„āį„É©„Ɇ„āíśõł„ĀĄ„Ā¶„ĀĄ„Ā¶Javadoc„Āģ„āą„ĀÜ„Ā™„ÉČ„ā≠„É•„É°„É≥„Éą„āíšĹúśąź„Āß„Āć„Āü„āČ„ĀĄ„ĀĄ„Ā™„ĀĀ „Ā®śÄĚ„Ā£„Ā¶PhpDocumentor„āíšĹŅ„Ā£„Ā¶„ĀŅ„Āĺ„Āó„Āü„Äā
„Āĺ„Āö„ĀĮ„ÄĀWindows„ĀęXAMPP„āí„ā§„É≥„āĻ„Éą„Éľ„Éę„Āó„ĀüÁíįŚĘÉ„Āß„ĀģPhpDocumentor„Āģ„āĽ„ÉÉ„Éą„āĘ„ÉÉ„Éó„ĀģśĖĻś≥ē„Āß„Āô„Äā
PhpDocumentor„Āģ„āĽ„ÉÉ„Éą„āĘ„ÉÉ„Éó
- XAMPP„ĀģPHP„ā§„É≥„āĻ„Éą„Éľ„ÉęŚÖą„Āģ„Éē„ā©„Éę„ÉÄ„ĀęPATH„ā퍮≠Śģö„Āó„Āĺ„Āô„Äā
ÔľąXAMPP„Āģ„āĽ„ÉÉ„Éą„āĘ„ÉÉ„Éó„Āę„Ā§„ĀĄ„Ā¶„ĀĮ„Āď„Ā°„āČ„āí„ĀĒŤ¶ß„ĀŹ„Ā†„Āē„ĀĄÔľČ
‚óÜPATH„ĀģŤ®≠ŚģöśĖĻś≥ē‚óÜ
‚Ė† Windows2000„ÄĀXP„Āß„ĀģŤ®≠ŚģöśĖĻś≥ē
„ÄĆ„ā≥„É≥„Éą„É≠„Éľ„Éę„ÉĎ„Éć„Éę„Äć„Āč„āČ„ÄĆ„ā∑„āĻ„É܄Ɇ„Äć„āíťĖč„Āć„Āĺ„Āô„Äā
„Āô„āč„Ā®„ÄĀ„ÄĆ„ā∑„āĻ„É܄Ɇ„Āģ„Éó„É≠„ÉĎ„ÉÜ„ā£„Äć„ā¶„ā§„É≥„ÉČ„ā¶„ĀĆťĖč„ĀŹ„Āģ„Āß„ÄĆŤ©≥Áīį„Äć„āŅ„ÉĖ„āíťĀłśäě„Āó„ÄĆÁíįŚĘÉŚ§Čśēį„Äć„Éú„āŅ„É≥„āíśäľšłč„Āó„Āĺ„Āô„Äā
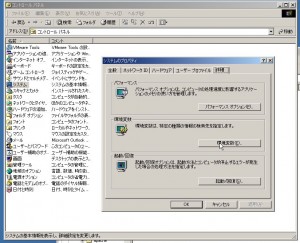
ÁíįŚĘÉŚ§Čśēį„ĀģŤ®≠Śģö„ā¶„ā§„É≥„ÉČ„ā¶„ĀĆťĖč„Āć„Āĺ„Āô„Äā
„ÄĆ„ā∑„āĻ„É܄ɆÁíįŚĘÉŚ§Čśēį„Äć„Āģšł≠„Āę„ÄĆPATH„Äć„Ā®„ĀĄ„ĀÜŚ§Čśēį„ĀĆ„Āā„āč„Āģ„ĀßťĀłśäě„Āó„ÄĀÁ∑®ťõÜ„Éú„āŅ„É≥„āíśäľšłč„Āó„Āĺ„Āô„Äā
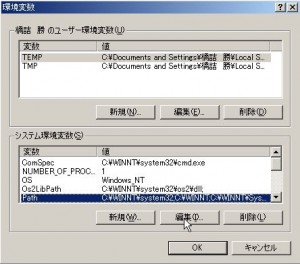
„ÄĆPATH„Äć„ĀģÁ∑®ťõÜÁĒĽťĚĘ„ĀĆŤ°®Á§ļ„Āē„āĆ„āč„Āģ„Āß„ÄĀ„ÄĆC:\xampp\php;„Äć„āíŤŅŌ䆄Āó„Āĺ„Āô„Äā
ŤŅŌ䆄Āó„Āü„āČ„ÄĆOK„Äć„Éú„āŅ„É≥„āíśäľšłč„Āó„Āĺ„Āô„Äā
‚ÄĽ„ÄĆ;„Äć„ĀĆPATH„ĀģŚĆļŚąá„āäśĖáŚ≠ó„Āę„Ā™„Ā£„Ā¶„ĀĄ„āč„Āģ„ĀߌČć„Āģ„ÉĎ„āĻ„Ā®„ĀģťĖď„Āę„ÄĆ;„Äć„ĀĆ„Āā„āč„Āď„Ā®„āíÁĘļŤ™ć„Āó„Ā¶„ĀŹ„Ā†„Āē„ĀĄ„Äā

‚Ė† WindowsVista„Āß„ĀģŤ®≠ŚģöśĖĻś≥ē
„ÄĆ„ā≥„É≥„Éą„É≠„Éľ„Éę„ÉĎ„Éć„Éę„Äć„Āč„āČ„ÄĆ„ā∑„āĻ„É܄Ɇ„Ā®„É°„É≥„ÉÜ„Éä„É≥„āĻ„Äć„āíťĖč„Āć„Āĺ„Āô„Äā
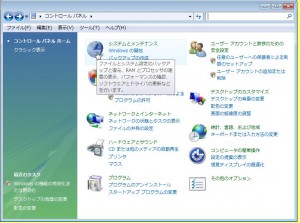
„Āô„āč„Ā®„ÄĀ„ÄĆ„ā∑„āĻ„É܄Ɇ„Ā®„É°„É≥„ÉÜ„Éä„É≥„āĻ„Äć„ā¶„ā§„É≥„ÉČ„ā¶„ĀĆťĖč„ĀŹ„Āģ„Āß„ÄĆ„ā∑„āĻ„É܄Ɇ„Äć„āíťĖč„Āć„Āĺ„Āô„Äā
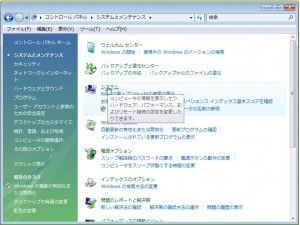
„Āô„āč„Ā®„ÄĆ„ā∑„āĻ„É܄Ɇ„Äć„ā¶„ā§„É≥„ÉČ„ā¶„ĀĆťĖč„ĀŹ„Āģ„Āß„ÄĀ„ÄĆ„ā∑„āĻ„É܄Ɇ„ĀģŤ©≥ÁīįŤ®≠Śģö„Äć„āí„āĮ„É™„ÉÉ„āĮ„Āó„Āĺ„Āô„Äā
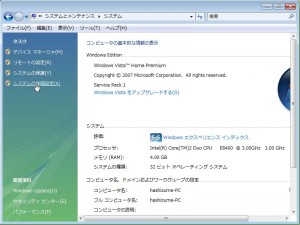
„ÄĆ„ā∑„āĻ„É܄Ɇ„Āģ„Éó„É≠„ÉĎ„ÉÜ„ā£„Äć„ĀĆťĖč„ĀŹ„Āģ„Āß„ÄĆŤ©≥ÁīįŤ®≠Śģö„Äć„Āģ„āŅ„ÉĖ„Āę„Āā„āč„ÄĆÁíįŚĘÉŚ§Čśēį„Äć„Éú„āŅ„É≥„āíśäľšłč„Āó„Āĺ„Āô„Äā
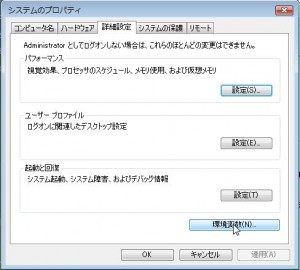
ÁíįŚĘÉŚ§Čśēį„ĀģŤ®≠Śģö„ā¶„ā§„É≥„ÉČ„ā¶„ĀĆťĖč„Āć„Āĺ„Āô„Äā
„ÄĆ„ā∑„āĻ„É܄ɆÁíįŚĘÉŚ§Čśēį„Äć„Āģšł≠„Āę„ÄĆPATH„Äć„Ā®„ĀĄ„ĀÜŚ§Čśēį„ĀĆ„Āā„āč„Āģ„ĀßťĀłśäě„Āó„ÄĀÁ∑®ťõÜ„Éú„āŅ„É≥„āíśäľšłč„Āó„Āĺ„Āô„Äā
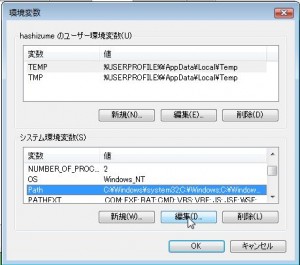
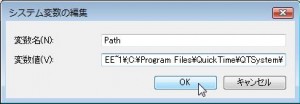
„ÄĆPATH„Äć„ĀģÁ∑®ťõÜÁĒĽťĚĘ„ĀĆŤ°®Á§ļ„Āē„āĆ„āč„Āģ„Āß„ÄĀ„ÄĆC:\xampp\php;„Äć„āíŤŅŌ䆄Āó„Āĺ„Āô„Äā
ŤŅŌ䆄Āó„Āü„āČ„ÄĆOK„Äć„Éú„āŅ„É≥„āíśäľšłč„Āó„Āĺ„Āô„Äā
‚ÄĽ„ÄĆ;„Äć„ĀĆPATH„ĀģŚĆļŚąá„āäśĖáŚ≠ó„Āę„Ā™„Ā£„Ā¶„ĀĄ„āč„Āģ„ĀߌČć„Āģ„ÉĎ„āĻ„Ā®„ĀģťĖď„Āę„ÄĆ;„Äć„ĀĆ„Āā„āč„Āď„Ā®„āíÁĘļŤ™ć„Āó„Ā¶„ĀŹ„Ā†„Āē„ĀĄ„Äā
- „ā≥„Éě„É≥„ÉČ„Éó„É≠„É≥„Éó„Éą„āíťĖč„ĀĄ„Ā¶„ÄĀšłÄŚļ¶PhpDcumentor„āí„āĘ„É≥„ā§„É≥„āĻ„Éą„Éľ„ÉęÁāļ„Āꚼ•šłč„Āģ„ā≥„Éě„É≥„ÉČ„āíŚģüŤ°Ć„Āó„Āĺ„Āô„Äā
ÔľąXAMPP„Āß„ā§„É≥„āĻ„Éą„Éľ„Éę„Āó„Ā¶„ĀĄ„āč„Ā®śóĘ„Āę„ā§„É≥„āĻ„Éą„Éľ„Éę„Āē„āĆ„Ā¶„ĀĄ„āč„Ā®śÄĚ„ĀĄ„Āĺ„Āô„ĀĆšłÄŚļ¶„āĘ„É≥„ā§„É≥„āĻ„Éą„Éľ„Éę„Āó„ĀŹ„Ā†„Āē„ĀĄÔľČ1
pear uninstall phpdocumentor
- PhpDocumentor„āí„ā§„É≥„āĻ„Éą„Éľ„Éę„Āó„Āĺ„Āô„Äā
„ā≥„Éě„É≥„ÉČ„Éó„É≠„É≥„Éó„Éą„ĀßšĽ•šłč„Āģ„ā≥„Éě„É≥„ÉČ„āíŚģüŤ°Ć„Āó„Āĺ„Āô„Äā1
pear install -a phpdocumentor
„Āď„āĆ„Āß„ÄĀPhpDocumentor„Āģ„ā§„É≥„āĻ„Éą„Éľ„Éę„ĀĆÁĶāšļÜ„Āó„Āĺ„Āó„Āü„Äā
PhpDocumentor„āíšĹŅ„Ā£„Ā¶„ĀŅ„āą„ĀÜ
„ā≥„Éě„É≥„ÉČ„āíŚģüŤ°Ć„Āó„Ā¶„ÄĀ„ÉČ„ā≠„É•„É°„É≥„Éą„āíšĹú„Ā£„Ā¶„ĀŅ„Āĺ„Āó„āá„ĀÜ
šĺčÔľČ
1 |
phpdoc -t ./phpdoc/ -d C:/htdocs/codeigniter/system/application/ |
-t„ā™„Éó„ā∑„Éß„É≥„ĀߌáļŚäõŚÖą„āíśĪļŚģö„ÄĀ-d„ā™„Éó„ā∑„Éß„É≥„Āßphpdoc„āíŚá¶ÁźÜ„Āô„āč„āĹ„Éľ„āĻ„ĀĆŚ≠ėŚú®„Āô„āč„Éá„ā£„ɨ„āĮ„Éą„É™„āíśĆáŚģö„Āó„Ā¶„ĀĄ„Āĺ„Āô„Äā
Ť©≥„Āó„ĀĄ„ā≥„Éě„É≥„ÉČ„Āģ„ā™„Éó„ā∑„Éß„É≥ŚÜÖŚģĻ„ĀĮ„ÄĀ„Āď„Ā°„āČ„āí„ĀĒŤ¶ß„ĀŹ„Ā†„Āē„ĀĄ„ÄāPDF„Éē„ā°„ā§„Éę„Ā™„Ā©„Āę„āāŚáļŚäõ„Āß„Āć„Āĺ„Āô„āą
„Ā°„āá„Ā£„Ā®„Ā†„ĀĎ„ā≥„Éě„É≥„ÉČŤß£Ť™¨
- -t„ā™„Éó„ā∑„Éß„É≥ÔľöšĹúśąź„Āē„āĆ„Āü„Éē„ā°„ā§„Éę„ĀģŚáļŚäõŚÖąÔľąÁõłŚĮĺ„ÉĎ„āĻ„ÄĀÁĶ∂ŚĮĺ„ÉĎ„āĻ„Ā©„Ā°„āČ„ĀßśĆáŚģö„Āô„āč„Āď„Ā®„āāŚŹĮŤÉĹ„Āß„ĀôÔľČ
- -d„ā™„Éó„ā∑„Éß„É≥Ôľö„ÉČ„ā≠„É•„É°„É≥„Éą„āíšĹúśąź„Āô„āč„Éē„ā°„ā§„Éę„ĀĆŚÖ•„Ā£„Ā¶„ĀĄ„āč„Éá„ā£„ɨ„āĮ„Éą„É™„āíśĆáŚģö„Āô„āčÔľąÁõłŚĮĺ„ÉĎ„āĻ„ÄĀÁĶ∂ŚĮĺ„ÉĎ„āĻ„Ā©„Ā°„āČ„ĀßśĆáŚģö„Āô„āč„Āď„Ā®„āāŚŹĮŤÉĹ„Āß„ĀôÔľČ
- -f„ā™„Éó„ā∑„Éß„É≥Ôľö„ÉČ„ā≠„É•„É°„É≥„Éą„āíšĹúśąź„Āô„āč„Éē„ā°„ā§„Éę„āíśĆáŚģö„Āô„āčÔľąÁõłŚĮĺ„ÉĎ„āĻ„ÄĀÁĶ∂ŚĮĺ„ÉĎ„āĻ„Ā©„Ā°„āČ„ĀßśĆáŚģö„Āô„āč„Āď„Ā®„āāŚŹĮŤÉĹ„Āß„ĀôÔľČ
- -o„ā™„Éó„ā∑„Éß„É≥Ôľö„ÉČ„ā≠„É•„É°„É≥„Éą„Āģ„ɨ„ā§„āĘ„ā¶„Éą„āíśĆáŚģö„Āô„āč
PDF„āĄ„ÄĀŤČ≤„ÄÖ„Ā™HTML„Āģ„ɨ„ā§„āĘ„ā¶„Éą„ĀĆśĆáŚģö„Āß„Āć„Āĺ„Āô„Äā
šĺčÔľČPDF„Āß„ĀģŚáļŚäõ1
phpdoc -t ./phpdoc -d ./application -o PDF:default:default
šĺčԾȄÉá„Éē„ā©„Éę„Éą„Ā®„ĀĮťĀē„Ā܄ɨ„ā§„āĘ„ā¶„Éą„Āß„ĀģŚáļŚäõÔľąśó•śú¨Ť™ě„āāśĖáŚ≠óŚĆĖ„ĀĎ„Āó„Ā™„ĀĄ„Āģ„Āß„Āď„āĆ„ĀĮ„ĀäŚčß„āĀ„ĀģŤ®≠ŚģöÔľČ
1
phpdoc -t ./phpdoc -d ./application -o HTML:Smarty:PHP
šĽĖ„Āę„āāŚÖą„ĀĽ„Ā©phpdoc„Āģ„ā≥„Éě„É≥„ÉČ„Āģ„É™„Éē„ā°„ɨ„É≥„āĻ„Āģ-o„ā™„Éó„ā∑„Éß„É≥„ĀģŚ†īśČÄ„ĀęŤČ≤„ÄÖ„Ā™output„ĀģŚáļŚäõ„Āß„Āć„āčŚģöÁĺ©„ĀĆ„Āģ„Ā£„Ā¶„ĀĄ„āč„Āģ„Āߍ©¶„Āó„Ā¶„ĀŅ„Ā¶„ĀŹ„Ā†„Āē„ĀĄ„Äā
Ôľąšł≠„Āę„ĀĮśĖáŚ≠ó„ā≥„Éľ„ÉČ„ĀĆśĆáŚģö„Āē„āĆ„Ā¶„ĀĄ„āčÁāļ„Āę„ÄĀśó•śú¨Ť™ě„ĀĆśĖáŚ≠óŚĆĖ„ĀĎ„Āô„āč„āā„Āģ„āāŚ≠ėŚú®„Āô„āč„Āģ„Āßś≥®śĄŹ„ĀĆŚŅÖŤ¶Ā„Āß„ĀôÔľČ
ŚáļŚäõÁ®ģť°ě„ĀģšłÄŤ¶ßÔľČ -o„ā™„Éó„ā∑„Éß„É≥„ĀßšĹŅÁĒ®„Āß„Āć„āčŚÄ§„ĀĮšĽ•šłč„Āģ„āā„Āģ„Āę„Ā™„āä„Āĺ„Āô
„ÉČ„ā≠„É•„É°„É≥„Éą„ĀĆŤčĪŤ™ě„Āßśõł„Āč„āĆ„Ā¶„ĀĄ„āč„Āģ„ĀßťĚĘŚÄí„Ā™„Āģ„Āß-o„ā™„Éó„ā∑„Éß„É≥„ĀßšĹŅÁĒ®„Āß„Āć„āčŚÄ§„ĀģšłÄŤ¶ß„āíśäúÁ≤č„Āó„Ā¶śõł„ĀĄ„Ā¶„Āä„Āć„Āĺ„Āó„Āü

1 2 3 4 5 6 7 8 9 10 11 12 13 14 15 16 17 18 19 20 21 |
HTML:frames:* - output is HTML with frames.
      HTML:frames:default - JavaDoc-like template, very plain, minimal formatting
      HTML:frames:earthli - BEAUTIFUL template written by Marco von Ballmoos
      HTML:frames:l0l33t - Stylish template
      HTML:frames:phpdoc.de - Similar to phpdoc.de PHPDoc output
      HTML:frames:phphtmllib - Very nice user-contributed template
      HTML:frames:phpedit - Based on output from PHPEdit Help Generator

HTML:Smarty:* - output is HTML with no frames.
      HTML:Smarty:default - Bold template design using css to control layout
      HTML:Smarty:HandS - Layout is based on PHP, but more refined, with logo image
      HTML:Smarty:PHP - Layout is identical to the PHP website

CHM:default:* - output is CHM, compiled help file format (Windows help).
      CHM:default:default - Windows help file, based on HTML:frames:l0l33t

PDF:default:* - output is PDF, Adobe Acrobat format
      PDF:default:default - standard, plain PDF formatting

XML:DocBook:* - output is XML, in DocBook format
      XML:DocBook/peardoc2:default - documentation ready for compiling into peardoc for online pear.php.net documentation, 2nd revision
|
PhpDocumentÁĒ®„Āģ„ā≥„É°„É≥„Éą„Āģśõł„ĀćśĖĻ
„ā≥„É°„É≥„Éą„Āģśõł„ĀćśĖĻ„ĀĮ„ÄĀ„Āď„Ā°„āČ„ā퍶č„Ā¶„ĀŹ„Ā†„Āē„ĀĄ„Äā
PHP„Éē„ɨ„Éľ„Ɇ„ÉĮ„Éľ„āĮ – CodeIgniterŚÖ•ťĖÄ„ÄÄCodeIgniter„āíŚčē„Āč„ĀĚ„ĀÜÔľĀÔľĀ
- 2009.02.21 (Śúü) 16:11
- PHP
- codeigniter,PHP
„Āĺ„Āö„ĀĮ„ÄĀÁŅí„ĀÜ„āą„āäśÖ£„āĆ„āć„Ā®„ĀĄ„ĀÜ„Āď„Ā®„ĀßCodeIgniter„āíŚčē„Āč„Āó„Ā¶„ĀŅ„Āĺ„Āó„āá„ĀÜ„Äā
CodeIgniter„Āģ„āĹ„Éľ„āĻ„Éē„ā°„ā§„Éę„āí„ÄĆCodeIgniter„Äć„Āģ„āĶ„ā§„Éą„Āč„āČ„ÉÄ„ā¶„É≥„É≠„Éľ„ÉČ„Āó„Ā¶„Āć„Ā¶„ĀŹ„Ā†„Āē„ĀĄ„Äā
(2009ŚĻī2śúą21śó•śôāÁāĻ„Āß„ĀĮ„ÄĀver1.7.1„Āß„Āó„ĀüÔľČ
„ÉÄ„ā¶„É≥„É≠„Éľ„ÉČ„Āó„ĀüŚúßÁłģ„Éē„ā°„ā§„Éę„ÄĆCodeIgniter_1.7.1.zip„Äć„āíŤß£Śáć„Āô„āč„Ā®
- system
- user_guide
- index.php
- license.txt
„Āģ4„Ā§„Āģ„Éē„ā©„Éę„ÉÄ„Ā®„Éē„ā°„ā§„Éę„ĀĆŚáļ„Ā¶„ĀŹ„āč„Ā®śÄĚ„ĀĄ„Āĺ„Āô„Äā
„Āď„ĀģŚáļ„Ā¶„Āć„Āüšł≠„Āč„āČ
- system
- index.php
„Āģ2„Ā§„āíWeb„āĶ„Éľ„Éź„Āč„āČŚŹāÁÖß„Āß„Āć„ā茆īśČÄ„ĀęťÖćÁĹģ„Āó„Ā¶„ĀŹ„Ā†„Āē„ĀĄ„Äā
Ôľą„ÉÜ„āĻ„ÉąÁíįŚĘÉ„ĀĆ„Āß„Āć„Ā¶„ĀĄ„Ā™„ĀĄ„āą„ĀÜ„Āß„Āó„Āü„āČ„ÄĀ„Āď„Ā°„āČ„ĀęťĖčÁôļÁíįŚĘÉ„ĀģśßčÁĮČśĖĻś≥ē„āí„Āģ„Āõ„Ā¶„ĀĄ„āč„Āģ„ĀßÁĘļŤ™ć„Āó„Ā¶„ĀŹ„Ā†„Āē„ĀĄÔľČ
ťÖćÁĹģ„Āß„Āć„Āü„āČindex.php„Āę„ā¶„āß„ÉĖ„ÉĖ„É©„ā¶„ā∂„Āß„āĘ„āĮ„āĽ„āĻ„Āó„Ā¶„ĀŅ„Ā¶„ĀŹ„Ā†„Āē„ĀĄ„Äā
ÁßĀ„Āģ„ÉÜ„āĻ„ÉąÁíįŚĘÉ„Āß„ĀĮ„ÄĆhttp://192.168.25.130:8000„Äć„Āę„Ā¶ŚŹāÁÖß„Āß„Āć„āčWeb„āĶ„Éľ„Éź„Éľ„Āę„ÄĆci„Äć„Ā®„ĀĄ„ĀÜŚźćŚČć„Āģ„Éē„ā©„Éę„ÉÄ„āíšĹúśąź„Āó„Ā¶„ÄĆci„Äć„Éē„ā©„Éę„ÉÄ„Āģšł≠„ĀęťÖćÁĹģ„Āó„Āü„Āģ„Āß
„ÄĆhttp://192.168.25.130:8000/ci/index.php„Äć„Āę„āĘ„āĮ„āĽ„āĻ„Āô„āč„Ā®šĽ•šłč„Āģ„āą„ĀÜ„Ā™„Éö„Éľ„āł„ĀĆŤ°®Á§ļ„Āē„āĆ„Āĺ„Āô„Äā
„Āď„āĆ„ĀĆŤ°®Á§ļ„Āē„āĆ„Āü„āČ„Ā®„āä„Āā„Āą„ĀöCodeIgniter„āíšĹŅÁĒ®„Āô„āčÁāļ„ĀģśļĖŚāô„ĀĮ„Āß„Āć„Āĺ„Āó„Āü„Äā
‚ÄĽ„ÄÄhttp://192.168.25.130:8000/ci/index.php„ĀĮ„ÄĀÁßĀ„ĀģÁíįŚĘÉ„Ā™„Āģ„ĀߌźĄŤá™„Āģ„ÉÜ„āĻ„ÉąÁíįŚĘÉ„Āß„Āģ„āĘ„ÉȄɨ„āĻ„Āꍙ≠„ĀŅÁõī„Āó„Ā¶„ĀŹ„Ā†„Āē„ĀĄ„Ā≠
„Āď„ĀģŚčēšĹú„ĀĆ„Ā©„Āģ„āą„ĀÜ„ĀęŚčē„ĀĄ„Ā¶„ĀĄ„āč„Āč„Āß„Āô„ĀĆ
- index.php„Āģšł≠„ĀßCodeIgniter„Āģ„ā≥„āĘ„Éē„ā°„ā§„Éę„ĀĆŤ™≠„ĀŅŤĺľ„Āĺ„āĆ„Āĺ„Āô„Äā
- „ÄĆsystem\application\config„Äć„Āģšł≠„Āę„Āā„āčroutes.php„Āģ43Ť°ĆÁõģ
1
$route['default_controller'] = "welcome";
„ĀģŤ®ėŤŅį„ā퍶č„Ā¶CodeIgniter„ĀĮwelcom„Ā®„ĀĄ„ĀÜ„ā≥„É≥„Éą„É≠„Éľ„É©„Éľ„āíŚčē„Āč„Āó„ĀꍰƄĀć„Āĺ„Āô„Äā
Ôľą„ā≥„É≥„Éą„É≠„Éľ„É©„Éľ„ĀģśĆáŚģö„ĀĆ„Ā™„ĀĄ„Āü„āĀÔľČ - „ÄĆsystem\application\controllers„Äć„Āģšł≠„Āģwelcom.php„Āģindex„É°„āĹ„ÉÉ„ÉČ„ĀĆŚģüŤ°Ć„Āē„āĆ„Āĺ„Āô„Äā
1
2
3
4
5
6
7
8
9
10
11
12
13
14
15
16
17
<?php

class Welcome extends Controller {

	function Welcome()
	{
		parent::Controller();
	}

	function index()
	{
		$this->load->view('welcome_message');
	}
}

/* End of file welcome.php */
/* Location: ./system/application/controllers/welcome.php */
- 12Ť°ĆÁõģ„ĀģŤ®ėŤŅį„ā퍶č„Ā¶CodeIgniter„ĀĮ„ÄĆsystem\application\views„Äć„Āģšł≠„Āģwelcome_message.php„āíŚĎľ„Ā≥Śáļ„ĀóŚÖą„ĀĽ„Ā©„Āģ„ÄĆWelcome to CodeIgniter!„ÄćÁĒĽťĚĘ„ā퍰®Á§ļ„Āó„Ā¶„ĀĄ„Āĺ„Āô„Äā
„Āď„āĆ„ĀĆšĽä„ÄĀ„ÄĆWelcome to CodeIgniter!„ÄćÁĒĽťĚĘ„ĀĆŤ°®Á§ļ„Āē„āĆ„ĀüŚčē„Āć„Āß„Āô„Äā
„Āď„Āď„Āĺ„Āß„ĀģśĶĀ„āĆ„āíŤĀě„ĀĄ„Ā¶„Éē„ɨ„Éľ„Ɇ„ÉĮ„Éľ„āĮ„āíšĹŅÁĒ®„Āó„Āü„Āď„Ā®„ĀĆÁĄ°„ĀĄšļļ„Āę„ĀĮ„ÄĀ„Ā™„āď„Āß„ĀĚ„ĀÜ„Ā™„āč„Āģ
„Ā£„Ā¶ÁĖĎŚēŹ„Ā®„āą„ĀŹ„āŹ„Āč„āČ„āď„Ā®„ĀĄ„ĀÜśĄüśÉ≥„ĀĆśģč„Ā£„Āü„Āč„āā„Āó„āĆ„Āĺ„Āõ„āď„Äā
„Ā™„Āģ„Āß„ÄĀCodeIgniter„Ā®„ĀĄ„ĀÜ„Éē„ɨ„Éľ„Ɇ„ÉĮ„Éľ„āĮ„ĀģŚčēšĹú„ā퍙¨śėé„Āó„Āü„ĀĄ„Ā®śÄĚ„ĀĄ„Āĺ„Āô„Äā
„Ā®śÄĚ„ĀĄ„Āĺ„Āó„Āü„ĀĆšĽäŚõě„ĀĮ„Āď„Āď„Āĺ„Āß„ÄĀś¨°ŚõěŤß£Ť™¨„ĀĄ„Āü„Āó„Āĺ„Āô„Äā
„Āä„Āô„Āô„āĀ„Éó„É≠„āį„É©„Ɇ„É©„É≥„ÉĀ„É£„Éľ„ÄÄnrlunch
- 2009.02.20 (ťáĎ) 13:59
- „āĹ„Éē„Éą„ā¶„āß„āĘ
šĽäŚõě„ĀĮ„ÄĀÁßĀ„ĀĆšĹŅ„Ā£„Ā¶„ĀĄ„āč„ÉĎ„āĹ„ā≥„É≥„Āę„ĀĮÁĶ∂ŚĮĺ„Āę„ā§„É≥„āĻ„Éą„Éľ„Éę„Āó„Ā¶„ĀĄ„āč„āĹ„Éē„Éą„ĀģÁīĻšĽč„Āß„Āô„Äā
„Éó„É≠„āį„É©„Ɇ„É©„É≥„ÉĀ„É£„Éľ„Āģ„ÄĆnrlunch„Äć„Āß„Āô„Äā
„Āď„Āģ„āĹ„Éē„Éą„Ā™„Āę„ĀĆŚĄ™„āĆ„Ā¶„ĀĄ„āč„Āč„Ā®„ĀĄ„ĀÜ„Ā®„ÄĀ
- ŤĽĹ„ĀĄ

- Áį°Śćė„Āę„āĘ„Éó„É™„ĀĆÁôĽťĆ≤„Āß„Āć„āč

- „Éõ„ÉÉ„Éą„ā≠„Éľ„Āß„ÄĀŤ°®Á§ļŚŹĮŤÉĹ

- „ĀŹ„āč„ĀŹ„āč„Éě„ā¶„āĻ„Āߍ°®Á§ļŚŹĮŤÉĹ

„Ā™„Ā©„Ā™„Ā©„ÄĀŤČ≤„ÄÖ„Āā„āä„Āĺ„Āô„Äā
„Āď„Āģ„É©„É≥„ÉĀ„É£„Éľ„ĀęŤĺŅ„āäÁĚÄ„ĀŹ„Āĺ„Āß„ĀęśēįŚćĀŚÄč„Āģ„É©„É≥„ÉĀ„É£„Éľ„ā퍩¶„Āó„ĀęšĹŅ„Ā£„Ā¶„ĀŅ„Ā¶„Āď„āĆ„ĀĆšłÄÁē™šĹŅ„ĀĄ„āĄ„Āô„Āč„Ā£„Āü„Āß„Āô„Äā
Śģüťöõ„Āęnrlunch„āíŚčē„Āč„Āó„ĀüFlashŚčēÁĒĽ„āíšĹú„Ā£„Āü„Āģ„Āߍ¶č„Ā¶„ĀŹ„Ā†„Āē„ĀĄ„Äā
śúąť°ć1,050ŚÜÜ„Āßťęėś©üŤÉĹ„ÉĽŚģČŚŅɄɨ„É≥„āŅ„Éę„āĶ„Éľ„Éź„Éľ ![]()
„Éě„Éę„ÉĀ„ÉČ„É°„ā§„É≥ŚĮĺŚŅú„ÄĀ„Éď„āł„Éć„āĻšĽēśßė ťęėśÄߍÉńɨ„É≥„āŅ„Éę„āĶ„Éľ„Éź„Éľ „Äź„ā∑„ÉÉ„āĮ„āĻ„ā≥„āĘ„ÄĎ ![]()
„Āď„āĆ„ĀĮ„ÄĀ„ĀŹ„āč„ĀŹ„āč„Éě„ā¶„āĻ„ĀģŚčēšĹú„Āß„Āô„ĀĆ„ÄĀ2Śõ썼ʄÉě„ā¶„āĻ„āíŚčē„Āč„Āô„Ā®nrlunch„ĀĆŤĶ∑Śčē„Āó„ÄĀŚčē„Āč„Āó„Āü„ĀĄ„āĘ„Éó„É™„āĪ„Éľ„ā∑„Éß„É≥„āí„āĮ„É™„ÉÉ„āĮ„Āô„āč„Āď„Ā®„ĀߌčēšĹú„Āē„Āõ„āč„Āď„Ā®„ĀĆ„Āß„Āć„Āĺ„Āô„Äā
„Āč„Ā™„āäšĺŅŚą©„Āß„Āô„āą„Äā
„Ā†„Āĺ„Āē„āĆ„Āü„Ā®śÄĚ„Ā£„Ā¶šłÄŚõěšĹŅ„Ā£„Ā¶„ĀŅ„Ā¶„ĀŹ„Ā†„Āē„ĀĄ„Äā
„ÉÄ„ā¶„É≥„É≠„Éľ„ÉČ„ĀĮ„ÄĀšĹúŤÄÖ„ĀĆÁ™ĀÁĄ∂„āĶ„ā§„Éą„āí„āĄ„āĀ„Ā¶„Āó„Āĺ„Ā£„Āü„Āģ„Āߌą•„Āģ„āĶ„ā§„Éą„Āߌ֨ťĖč„Āē„āĆ„Ā¶„ĀĄ„āč„Āģ„Āß„ĀĚ„Ā°„āČ„Āč„āČ„ÉÄ„ā¶„É≥„É≠„Éľ„ÉČ„Āó„Ā¶„ĀŹ„Ā†„Āē„ĀĄ„Äā
„ÉÄ„ā¶„É≥„É≠„Éľ„ÉČŚÖąÔľö„ÄĆŤĽĹŚŅę„Ā™„āĘ„Éó„É™ŤĶ∑Śčē„É©„É≥„ÉĀ„É£„ÄĆnrLaunch„ÄćÔľą+ŚčĚśČč„Āę„Éü„É©„ɾԾȄÄć
PHPŚŅúÁĒ®„ÄÄ„ā≥„É≥„āŅ„āĮ„Éą„Éē„ā©„Éľ„Ɇ„ĀģšĹúśąź
„ā≥„É≥„āŅ„āĮ„Éą„Éē„ā©„Éľ„Ɇ„āíšĹúśąź„Āó„Āĺ„Āó„āá„ĀÜ„Äā
„Āĺ„Āö„ĀĮ„ÄĀ„Āď„Āģ„āą„ĀÜ„Ā™„ÄĆ„Éá„ÉĘÔľö„ā≥„É≥„āŅ„āĮ„Éą„Éē„ā©„Éľ„Ɇ„Äć„āíšĹú„āä„Āĺ„Āô„Äā
„Éá„ÉĘ„ĀߌčēšĹú„āíÁĘļŤ™ć„Āó„Ā¶„ĀŅ„Ā¶„ĀŹ„Ā†„Āē„ĀĄ„Äā
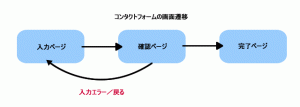
ÁĒĽťĚĘťĀ∑Á߼„ĀĮšĽ•šłč„Āģ„āą„ĀÜ„Āę„Ā™„āä„Āĺ„Āô„Äā
„āą„ĀŹ„Āā„āč„ā≥„É≥„āŅ„āĮ„Éą„Éē„ā©„Éľ„Ɇ„Āß„Āô„Äā
- „Āĺ„Āö„ÄĀŚÖ•ŚäõÁĒĽťĚĘ„ā퍰®Á§ļ„Āó„ā≥„É≥„āŅ„āĮ„ÉąŚÜÖŚģĻ„āíŚÖ•Śäõ„Āó„Ā¶„āā„āČ„ĀĄ„Āĺ„Āô„Äā
- ŚÖ•Śäõ„ĀĆÁĶāšļÜ„Āó„Āü„āČÁĘļŤ™ćÁĒĽťĚĘ„ĀęťĀ∑Á߼„ĀóŚÖ•ŚäõŚÜÖŚģĻ„ĀģÁĘļŤ™ć„āí„Āß„Āć„āč„āą„ĀÜ„Āę„Āó„Āĺ„Āô„Äā
„Āď„Āď„Āß„ÄĀŚÖ•ŚäõŚÜÖŚģĻ„Āꍙ§„āä„ĀĆ„Āā„Ā£„ĀüŚ†īŚźą„ĀĮ„ÄĀŚÖ•ŚäõÁĒĽťĚĘ„ĀęśąĽ„Ā£„Ā¶šŅģś≠£„Āó„Ā¶„āā„āČ„ĀĄ„Āĺ„Āô„Äā - ŚÖ•ŚäõŚÜÖŚģĻ„Āꍙ§„āä„ĀĆ„Ā™„ĀĄŚ†īŚźą„ÄĀŚÖ•ŚäõŚÜÖŚģĻ„āíśäēÁ®Ņ„Āó„Ā¶„āā„āČ„ĀĄŚģĆšļÜ„Éö„Éľ„āł„ā퍰®Á§ļ„Āó„ÄĀ„ā≥„É≥„āŅ„āĮ„ÉąśäēÁ®Ņ„Āó„Āü„Āď„Ā®„ā퍰®Á§ļ„Āó„Āĺ„Āô„Äā
šłÄťÄ£„Āģ„Éó„É≠„āį„É©„Ɇ„ĀģśĶĀ„āĆ„ĀĮ„Āď„āď„Ā™śĄü„Āė„ĀßšĹúśąź„Āó„Āü„ĀĄ„Ā®śÄĚ„ĀĄ„Āĺ„Āô„Äā
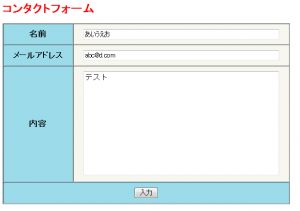
„Āĺ„Āö„ĀĮ„ÄĀŚÖ•Śäõ„Éö„Éľ„āł„ĀģšĹúśąź„Āß„Āô„Äā
„Āď„āď„Ā™„Éö„Éľ„āł„āíšĹú„āä„Āĺ„Āô„Äā
„āĹ„Éľ„āĻÔľöinput.php
1 2 3 4 5 6 7 8 9 10 11 12 13 14 15 16 17 18 19 20 21 22 23 24 25 26 27 28 29 30 31 32 33 34 35 36 37 38 39 40 41 42 43 44 45 46 47 48 49 50 51 52 53 54 55 56 57 58 59 60 61 62 63 64 65 66 67 68 69 |
<?php $contactname = $_POST["contactname"]; $contactmail = $_POST["contactmail"]; $contents = $_POST["contents"]; ?> <!DOCTYPE html PUBLIC "-//W3C//DTD XHTML 1.0 Strict//EN" "http://www.w3.org/TR/xhtml1/DTD/xhtml1-strict.dtd"> <html xmlns="http://www.w3.org/1999/xhtml" dir="ltr" lang="ja"> <head> <meta http-equiv="Content-Type" content="text/html; charset=UTF-8" /> <title>„ā≥„É≥„āŅ„āĮ„Éą„Éē„ā©„Éľ„Ɇ</title> <style TYPE="text/css"> <!-- H1 { color: red; font-size: 18pt; } #contact-form th { background-color: #9bdbea; padding: 10px 20px; } #contact-form td { background-color: #f7f7ef; padding: 10px 20px; } #contact-form td input { width: 400px; } #contact-form td textarea { width: 400px; } --> </style> </head> <body> <h1>„ā≥„É≥„āŅ„āĮ„Éą„Éē„ā©„Éľ„Ɇ</h1> <form action="./confirm.php" method="post"> <table id="contact-form" border="1" cellpadding="0" cellspacing="0"> <tr> <th> ŚźćŚČć </th> <td> <input type="text" name="contactname" value="<?= $contactname ?>" /> </td> </tr> <tr> <th> „É°„Éľ„Éę„āĘ„ÉȄɨ„āĻ </th> <td> <input type="text" name="contactmail" value="<?= $contactmail ?>" /> </td> </tr> <tr> <th> ŚÜÖŚģĻ </th> <td> <textarea name="contents" rows="10"><?= $contents ?></textarea> </td> </tr> <tr> <th colspan="2"> <input type="submit" value="ŚÖ•Śäõ"> </th> </tr> </table> </form> </body> </html> |
form„āŅ„āį„āíšĹŅÁĒ®„Āó„Ā¶ś¨°„Āģ„Éö„Éľ„āł„Āę„Éá„Éľ„āŅ„āíťÄĀšŅ°„Āß„Āć„āč„āą„ĀÜ„Āę„Āó„Āĺ„Āô„Äā
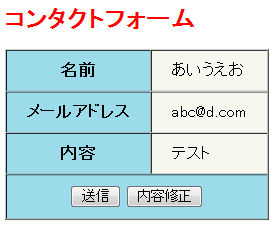
ś¨°„Āę„ÄĀÁĘļŤ™ćÁĒĽťĚĘ„āíšĹúśąź„Āó„Āĺ„Āó„āá„ĀÜ„Äā
ŚÜÖŚģĻ„Āꍙ§„āä„ĀĆ„Āā„Ā£„Āü„āČŚÜÖŚģĻšŅģś≠£„Éú„āŅ„É≥„Āߌ֕ŚäõÁĒĽťĚĘ„ĀęśąĽ„āä„Āĺ„Āô„Äā
„āĹ„Éľ„āĻÔľöconfirm.php
1 2 3 4 5 6 7 8 9 10 11 12 13 14 15 16 17 18 19 20 21 22 23 24 25 26 27 28 29 30 31 32 33 34 35 36 37 38 39 40 41 42 43 44 45 46 47 48 49 50 51 52 53 54 55 56 57 58 59 60 61 62 63 64 65 66 67 68 69 70 71 72 73 74 75 76 77 78 79 80 81 |
<?php $contactname = $_POST["contactname"]; $contactmail = $_POST["contactmail"]; $contents = $_POST["contents"]; ?> <!DOCTYPE html PUBLIC "-//W3C//DTD XHTML 1.0 Strict//EN" "http://www.w3.org/TR/xhtml1/DTD/xhtml1-strict.dtd"> <html xmlns="http://www.w3.org/1999/xhtml" dir="ltr" lang="ja"> <head> <meta http-equiv="Content-Type" content="text/html; charset=UTF-8" /> <title>„ā≥„É≥„āŅ„āĮ„Éą„Éē„ā©„Éľ„Ɇ</title> <style TYPE="text/css"> <!-- H1 { color: red; font-size: 18pt; } #contact-form th { background-color: #9bdbea; padding: 10px 20px; } #contact-form td { background-color: #f7f7ef; padding: 10px 20px; } #contact-form td input { width: 400px; } #contact-form td textarea { width: 400px; } form { display: inline; } --> </style> </head> <body> <h1>„ā≥„É≥„āŅ„āĮ„Éą„Éē„ā©„Éľ„Ɇ</h1> <table id="contact-form" border="1" cellpadding="0" cellspacing="0"> <tr> <th> ŚźćŚČć </th> <td> <?= $contactname ?> </td> </tr> <tr> <th> „É°„Éľ„Éę„āĘ„ÉȄɨ„āĻ </th> <td> <?= $contactmail ?> </td> </tr> <tr> <th> ŚÜÖŚģĻ </th> <td> <?= $contents ?> </td> </tr> <tr> <th colspan="2"> <form action="./end.php" method="post"> <input type="hidden" name="contactname" value="<?= $contactname ?>"> <input type="hidden" name="contactmail" value="<?= $contactmail ?>"> <input type="hidden" name="contents" value="<?= $contents ?>"> <input type="submit" value="ťÄĀšŅ°" /> </form> <form action="./input.php" method="post"> <input type="hidden" name="contactname" value="<?= $contactname ?>"> <input type="hidden" name="contactmail" value="<?= $contactmail ?>"> <input type="hidden" name="contents" value="<?= $contents ?>"> <input type="submit" value="ŚÜÖŚģĻšŅģś≠£" /> </form> </th> </tr> </table> </body> </html> |
„Āď„Āď„Āß„ĀĮ„ÄĀ<input type="hidden">„āŅ„āį„āíšĹŅ„Ā£„Ā¶ŚČć„ĀģÁĒĽťĚĘ„ÄĀś¨°„ĀģÁĒĽťĚĘ„Āłśł°„Āô„Éá„Éľ„āŅ„āíšŅĚśĆĀ„Āó„Āĺ„Āô„Äā
„Āĺ„Āü„ÄĀŚČćÁĒĽťĚĘ„Āč„āČ„Āģ„Éá„Éľ„āŅ„ĀĮPOST„É°„āĹ„ÉÉ„ÉČ„Āę„Ā¶ťÄĀšŅ°„Āó„Āü„Āģ„Āß„ÄĀ$_POSTťÖ挹ó„Ā꜆ľÁīć„Āē„āĆ„Āĺ„Āô„Äā
„Ā™„Āģ„Āß„ÄĀ$_POSTŚ§Čśēį„āíšĹŅÁĒ®„Āó„Ā¶ŚČć„Āģ„Éö„Éľ„āł„Āč„āČ„ĀģťÄĀšŅ°„Éá„Éľ„āŅ„ā팏ĖŚĺó„Āó„Āĺ„Āô„Äā
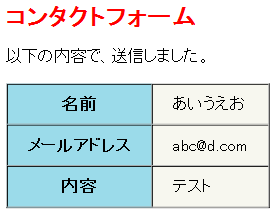
śúÄŚĺĆ„ĀęťÄĀšŅ°ÁĒĽťĚĘ„Āß„Āô„Äā
„Āď„ĀģÁĒĽťĚĘ„Āß„ĀĮŚČć„ĀģÁĒĽťĚĘ„Āč„āČ„Āģ„Éá„Éľ„āŅ„ā팏ĖŚĺó„Āó„Ā¶„É°„Éľ„Éę„Āę„Ā¶ŚÜÖŚģĻ„āíťÄĀšŅ°„Āó„Āĺ„Āô„Äā
PHP„Āß„Āģ„É°„Éľ„Éę„ĀģťÄĀšŅ°„āā„Āó„Ā¶„ĀĄ„Āĺ„Āô„Äā
„āĹ„Éľ„āĻÔľöend.php
1 2 3 4 5 6 7 8 9 10 11 12 13 14 15 16 17 18 19 20 21 22 23 24 25 26 27 28 29 30 31 32 33 34 35 36 37 38 39 40 41 42 43 44 45 46 47 48 49 50 51 52 53 54 55 56 57 58 59 60 61 62 63 64 65 66 67 68 69 70 71 72 73 74 75 76 77 |
<?php $contactname = $_POST["contactname"]; $contactmail = $_POST["contactmail"]; $contents = $_POST["contents"]; //„É°„Éľ„ÉęťÄĀšŅ°Śá¶ÁźÜ mb_language('ja'); $from = mb_encode_mimeheader($contactname)."<".$contactmail.">"; $reply_to = $from; $to = '„Āď„Āď„ĀĮŚźĄŤá™„Āģ„É°„Éľ„Éę„āĘ„ÉȄɨ„āĻ„ā퍮≠Śģö„Āó„Ā¶„ĀŹ„Ā†„Āē„ĀĄ'; $header = "From: $from\n"; $header .= "Reply-To: $reply_to\n"; $header .= "X-Mailer: myphpMail ". phpversion(). "\n"; $subject = "„ÄźPHPŚŅúÁĒ®„ÄÄ„ā≥„É≥„āŅ„āĮ„Éą„Éē„ā©„Éľ„Ɇ„ĀģšĹúśąź„ÄĎ"; $message = $contents; mb_send_mail($to, $subject, $message, $header); ?> <!DOCTYPE html PUBLIC "-//W3C//DTD XHTML 1.0 Strict//EN" "http://www.w3.org/TR/xhtml1/DTD/xhtml1-strict.dtd"> <html xmlns="http://www.w3.org/1999/xhtml" dir="ltr" lang="ja"> <head> <meta http-equiv="Content-Type" content="text/html; charset=UTF-8" /> <title>„ā≥„É≥„āŅ„āĮ„Éą„Éē„ā©„Éľ„Ɇ</title> <style TYPE="text/css"> <!-- H1 { color: red; font-size: 18pt; } #contact-form th { background-color: #9bdbea; padding: 10px 20px; } #contact-form td { background-color: #f7f7ef; padding: 10px 20px; } #contact-form td input { width: 400px; } #contact-form td textarea { width: 400px; } form { display: inline; } --> </style> </head> <body> <h1>„ā≥„É≥„āŅ„āĮ„Éą„Éē„ā©„Éľ„Ɇ</h1> <p>šĽ•šłč„ĀģŚÜÖŚģĻ„Āß„ÄĀťÄĀšŅ°„Āó„Āĺ„Āó„Āü„Äā</p> <table id="contact-form" border="1" cellpadding="0" cellspacing="0"> <tr> <th> ŚźćŚČć </th> <td> <?= $contactname ?> </td> </tr> <tr> <th> „É°„Éľ„Éę„āĘ„ÉȄɨ„āĻ </th> <td> <?= $contactmail ?> </td> </tr> <tr> <th> ŚÜÖŚģĻ </th> <td> <?= $contents ?> </td> </tr> </table> </body> </html> |
9Ť°ĆÁõģ„Āģ„É°„Éľ„Éę„āĘ„ÉȄɨ„āĻ„ĀĮ„ÄĀŚźĄŤá™Ť®≠Śģö„Āó„Ā¶„ĀŹ„Ā†„Āē„ĀĄ„Äā
ŚČć„Éö„Éľ„āł„Āč„āČťÄĀ„āČ„āĆ„Ā¶„Āć„Āü„Éá„Éľ„āŅ„āí„āā„Ā®„Āęmb_send_mailťĖĘśēį„āíšĹŅÁĒ®„Āó„Ā¶„É°„Éľ„Éę„āíťÄĀšŅ°„Āó„Āĺ„Āô„Äā
„É≠„Éľ„āę„ÉęÁíįŚĘÉ„Āß„ÉÜ„āĻ„Éą„Āó„Ā¶„ĀŅ„Ā¶
„Āď„Āģ„āą„ĀÜ„Ā™„ā®„É©„Éľ„ĀĆŚáļŚäõ„Āē„āĆ„ĀüŚ†īŚźą„ÄĀ„É°„Éľ„Éę„āĶ„Éľ„Éź„Éľ„ĀĆśßčÁĮČ„Āē„āĆ„Ā¶„ĀĄ„Ā™„ĀĄ„Āď„Ā®„ĀĆÁźÜÁĒĪ„Āß„Āô„Äā
„ɨ„É≥„āŅ„Éę„āĶ„Éľ„Éź„Éľ„ĀßÁĘļŤ™ć„Āô„āč„Āč„ÄĀ„É≠„Éľ„āę„ÉęÁíįŚĘÉ„Āę„É°„Éľ„Éę„āĶ„Éľ„Éź„Éľ„āíśßčÁĮČ„Āó„Ā¶ÁĘļŤ™ć„Āó„Ā¶„ĀŅ„Ā¶„ĀŹ„Ā†„Āē„ĀĄ„Äā
Áį°śėď„Āß„Āô„ĀĆ„Āď„āĆ„Āß„ā≥„É≥„āŅ„āĮ„Éą„Éē„ā©„Éľ„Ɇ„ĀģŚáļśĚ•šłä„ĀĆ„āä„Āß„Āô„Äā
CodeIgniterŚÖ•ťĖÄ
- 2009.02.19 (śú®) 10:32
- PHP
- codeigniter,PHP
PHP„ĀģŤĽĹťáŹ„Éē„ɨ„Éľ„Ɇ„ÉĮ„Éľ„āĮ„ÄĆCodeIgniter„Äć
śó•śú¨„Āß„ĀĮ„Āā„Āĺ„āäśúČŚźć„Āß„ĀĮ„Ā™„ĀĄ„Āß„Āô„ĀĆ „ÄĀPHP„Éē„ɨ„Éľ„Ɇ„ÉĮ„Éľ„āĮ„Āģšł≠„Āß„ĀĮśúÄťÄü„ā퍙á„āč„Éē„ɨ„Éľ„Ɇ„ÉĮ„Éľ„āĮ„Āß„Āô
šĹôŤ®ą„Ā™„Āď„Ā®„āí„Āó„Ā™„ĀĄ„Ā®„Āď„āć„āāÁĶźśßčÁī†śēĶ
Ť∂≥„āä„Ā™„ĀĄťÉ®ŚąÜ„ĀĮŤá™ŚąÜ„Āßś©üŤÉĹ„āíŤŅŌ䆄Āó„Ā™„ĀĄ„Ā®„ĀĄ„ĀĎ„Ā™„ĀĄ„ĀĆ„ÄĀ„ĀĚ„āĆ„Āß„āāšĹŅ„ĀĄ„āĄ„Āô„ĀēśäúÁ姄Āģ„Éē„ɨ„Éľ„Ɇ„ÉĮ„Éľ„āĮ„Āß„Āô„Äā
„Āď„āĆ„Āč„āČCodeIgniter„āíšĹŅÁĒ®„Āó„Ā¶„āĶ„ā§„Éą„āíśßčÁĮČ„Āó„Ā¶„ĀĄ„ĀŹ„Āģ„Āß„ĀĚ„ĀģťĀéÁ®č„āí„Āď„Āď„Āߌ֨ťĖč„Āó„Ā¶„ĀĄ„Āć„Āĺ„Āô„Äā

